-40%
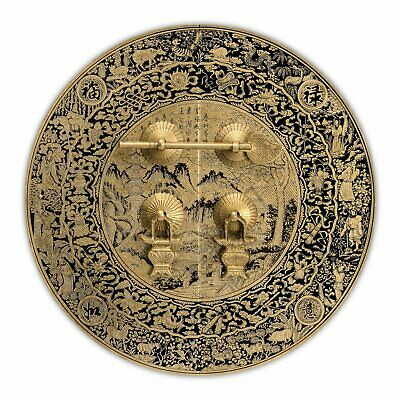
CBH MOUNTAIN SCENERY Chinese Brass Hardware 9.5"
$ 11.81
- Description
- Size Guide
Description
CBH MOUNTAIN SCENERY Chinese Brass Hardware 9.5"CBH MOUNTAIN SCENERY Chinese Brass Hardware 9.5"
This brass faceplate is painted with images of mountain scenery, bountiful harvests, and traditional New Year's blessings such as fish and flowers. It is intended as the face plate for a medium large cabinet, but in China these pieces of hardware are often framed and used as decorations by themselves.
Total assembled measurement is 9.45"W x 9.45"H x 0.75"D (240mm x 240mm x 19mm)
Pull measurement is 1.14"W x 1.77"H x 0.16"D (29mm x 45mm x 4mm)
Washer diameter measures 0.79" (20mm). Boring distance (distance between attachment points) measures 1.97" (50mm)
Total length of the key measures 4.4" (111mm). Post section of the key measures 3.3" (85mm). Post diameter measures 0.2" (5mm)
Includes a set of 1.8" (45mm) soft joining pins and a set of 0.6" (15mm) nails
Item AB-0100-24
Installation Guide
Chinese brass hardware is easy to install. The first thing to get familiar with are commonly used joining pins:
Soft Joining Pins
Made of bendable metal tongs that can be bent and hooked into the opposite side of the wood. Normally used for pulls, handles, and other items where lateral pulling strength is required.
Hard Joining Pins
Made of thick metal tongs that can be bent but not hooked around the opposite side of the wood. Normally used for bolts and hooks where vertical strength is required.
Nailing Pins
Made of one long, straight metal spear that is nailed into the wood. Like hard joining pins, they are used for bolts and hooks where vertical strength is required.
You'll need a few basic tools:
Needle nose pliers (recommended - but any type of pliers will do.)
Hammer
Drill bit (same width as the pin you're going to install)
Power drill
Installation of Soft Joining Pins
For this example, we've chosen a classic fish pull to install.
Drill a hole the same width as the pin. In this example we're drilling a 1/4" hole for a 1/4" wide pin.
Assemble your piece of hardware and insert in the hole.
Using the needle nose pliers, bend the tip of the pin over so that it's pointing towards the wood.
Making sure that the display side of the piece is pulled tight, nail the end of the pin into the wood.
Nail the pin flat.
Installation of Hard Joining Pins
In this example we've chosen a cabinet face plate to install.
Drill a hole the same width as the pins. In this example we're drilling a 1/4" hole for a 1/4" pin.
Assemble your piece of hardware and insert in the hole.
Using the needle nose pliers, spread the pins flat against the wood.
Making sure that the display side of the piece is pulled tight, nail the pin flat against the wood.
Note
: Unlike soft folding pins there's no need to hook the end of the pin into the wood - just nail it flat.
Installation of Nailing Pins
In this example, we've chosen a cabinet strip pull to install.
Drill a hole the same width as the pins. In this example we're drilling a 3/16 " hole for a 3/16 " pin.
Assemble your piece of hardware. Hammer the nailing pin into the pilot hole. We recommend using a piece of wood as a buffer to avoid damaging the hardware.
It's usually a good idea to file or clip the end of the nailing pin down if it is protrudes out the opposite side of the wood (this can be done before installation as well).
Nailing pins are as strong as very thick nails.
